Blood sugar control is one of the most important indicators of your health. Whether you’re managing diabetes, monitoring for prediabetes, or simply aiming for balanced wellness, knowing how to interpret glucose levels can empower you to take control of your health in real time.
Glucose levels are affected by what you eat, your physical activity, stress, medication, and even sleep. Understanding what your numbers mean whether from a glucometer, continuous glucose monitor (CGM), or lab test helps you make smarter decisions about food, exercise, and lifestyle.
In this guide, you’ll learn exactly how to interpret glucose levels, what’s considered normal, what values indicate trouble, and how different glucose tests provide insights into your health. From fasting glucose to post-meal spikes and A1C, we’ll break everything down in simple, actionable language.
Whether you’re newly diagnosed with diabetes, concerned about metabolic health, or just curious about optimizing your energy, this article is your complete reference to understanding glucose data clearly and confidently.
What Is Glucose and Why Does It Matter?
Glucose is a type of sugar that comes from the food you eat. It’s your body’s main source of energy, especially for the brain and muscles. After you eat, your body breaks down carbohydrates into glucose, which enters your bloodstream. Then, insulin, a hormone made by the pancreas, helps move glucose from the blood into your cells.
When this process works well, blood sugar levels stay in a healthy range. But when insulin is low or not working properly as in diabetes or insulin resistance glucose builds up in the blood, leading to various health complications.
Understanding how to interpret glucose levels allows you to catch imbalances early and adjust your habits to stay healthy.
Types of Glucose Tests: What Are You Measuring?
Before learning how to interpret glucose levels, you need to understand where the numbers come from. Here are the most common tests:
1. Fasting Blood Glucose (FBG)
- Taken after 8 hours without food
- Best indicator of baseline glucose control
- Used to diagnose diabetes or prediabetes
2. Postprandial Blood Glucose (PPBG)
- Taken 1–2 hours after eating
- Shows how your body handles glucose from meals
3. Oral Glucose Tolerance Test (OGTT)
- Measures response to a sugary drink over 2–3 hours
- Used during pregnancy or to diagnose insulin resistance
4. A1C (Glycated Hemoglobin)
- Average blood sugar over 2–3 months
- Expressed as a percentage (e.g., 6.5%)
- Doesn’t require fasting
5. Continuous Glucose Monitor (CGM)
- Measures glucose every few minutes via a sensor
- Great for spotting patterns and nighttime dips
6. Random Blood Glucose
- Taken any time of day, without fasting
- Less precise but can indicate an issue
Interpreting Fasting Glucose Levels
| Fasting Glucose (mg/dL) | Interpretation |
|---|---|
| Below 70 | Low (Hypoglycemia) |
| 70–99 | Normal |
| 100–125 | Prediabetes |
| 126 and above | Diabetes (confirmed with repeat test) |
Fasting glucose gives you a snapshot of how your body manages blood sugar without recent food. Levels consistently above 100 may indicate early insulin resistance or impaired fasting glucose.
Interpreting Post-Meal Glucose (Postprandial)
| 2 Hours After Eating (mg/dL) | Interpretation |
|---|---|
| Below 140 | Normal |
| 140–199 | Prediabetes |
| 200 and above | Possible Diabetes |
If your glucose spikes too high after meals, it could mean your body struggles to process sugars or carbs efficiently. Spikes over 160–180 may indicate poor insulin response.
How to Interpret A1C Levels
| A1C (%) | Average Glucose (mg/dL) | Interpretation |
|---|---|---|
| Below 5.7% | <117 | Normal |
| 5.7%–6.4% | 117–137 | Prediabetes |
| 6.5% and above | 137+ | Diabetes |
A1C reflects long-term glucose exposure. It’s useful for tracking diabetes management over time, but it doesn’t show daily highs or lows. Some people may have high spikes yet still have a normal A1C.
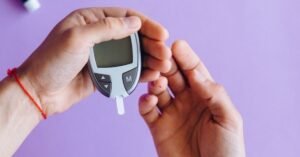
How to Use a Glucose Meter: Step-by-Step

If you’re monitoring blood sugar for diabetes, prediabetes, or general health, learning how to use a glucose meter is one of the most important habits you can adopt. Glucose meters, also called blood glucose monitors or glucometers, are small portable devices that help you track your blood sugar levels in real time. Used properly, they provide accurate readings that help guide your food, exercise, and medication decisions.
Whether you’re new to glucose monitoring or looking to improve your accuracy, this step-by-step guide will teach you how to use a glucose meter effectively and confidently.
Step 1: Wash and Dry Your Hands
Before you start, always wash your hands thoroughly with warm water and soap. This helps remove any sugar, dirt, or residue that could affect the reading. Dry your hands completely, as moisture can dilute the blood sample and skew results.
Tip: Don’t use alcohol wipes, as they may leave residue that affects accuracy.
Step 2: Prepare Your Meter and Supplies
Open your glucose monitoring kit, which usually includes:
- A glucose meter
- Test strips
- A lancet device (finger-pricking tool)
- Sterile lancets
- A logbook or mobile tracking app
Make sure your test strips are not expired and compatible with your meter.
Step 3: Insert the Test Strip
Insert a fresh test strip into the glucose meter as per the device instructions. Most meters automatically turn on when the strip is inserted. The screen will prompt you to apply a blood sample once the strip is properly seated.
Step 4: Prick the Side of Your Fingertip
Load a sterile lancet into the lancing device. Adjust the depth setting if your device allows. Position the lancing device against the side of your fingertip (not the center) and press the button to release the lancet.
Using the side of the fingertip reduces pain and provides a better blood drop.
Step 5: Collect the Blood Sample
Gently squeeze or massage the pricked finger to form a small drop of blood. Touch the edge of the test strip to the drop—don’t smear it or press too hard.
Your glucose meter will draw in the blood through capillary action and display a reading within 5 to 10 seconds.
Step 6: Record Your Reading
Note your blood sugar level, the time, and context (e.g., “fasting,” “2 hours after lunch”). Most modern meters store results automatically, but keeping a manual log or mobile app allows you to track trends, triggers, and improvements over time.
Step 7: Dispose of Used Materials Safely
Throw away used lancets and test strips in a sharps container or a sealed plastic bottle. Never reuse lancets. Clean your meter and lancing device as recommended by the manufacturer.
Extra Tip: Check at the Right Times
To get the most useful data, check your glucose:
- Fasting (morning before food)
- Before meals
- 2 hours after meals
- Before bed
Checking regularly helps you identify patterns and better manage your blood sugar.
By keeping records, you’ll see trends over time and better understand how to interpret glucose levels in different scenarios.
Glucose Monitoring Frequency (By Condition)
| Condition | When to Check Glucose |
|---|---|
| Type 1 Diabetes | 4–10 times/day |
| Type 2 Diabetes (on insulin) | 2–4 times/day |
| Type 2 (not on insulin) | 1–2 times/day or a few times/week |
| Prediabetes or general health | Fasting and post-meal checks 2–3 times/week |
| Using CGM | Continuous tracking, 24/7 |
What Affects Glucose Levels?
Knowing how to interpret glucose levels also means understanding what influences them.
Glucose Can Rise Due To:
- High-carb meals
- Skipping medication or insulin
- Stress and anxiety
- Illness or infection
- Lack of physical activity
- Poor sleep
Glucose Can Drop Due To:
- Skipping meals
- Overmedicating
- Intense exercise without fuel
- Alcohol consumption (especially on an empty stomach)
The Dawn Phenomenon and Somogyi Effect
Sometimes, people wake up with high fasting glucose despite eating well the night before. Why?
Dawn Phenomenon:
- Early morning (4–8 AM) hormonal surge increases glucose
- Common in people with diabetes
Somogyi Effect:
- Rebound high sugar after a nighttime low
- Caused by overmedication or skipping dinner
Understanding these patterns helps you interpret morning glucose levels more accurately.
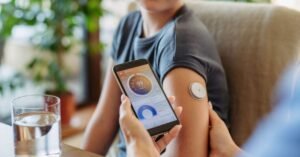
Interpreting CGM Data and Glucose Trends
CGMs allow you to see real-time glucose curves. Instead of isolated numbers, you see:
- Spikes after certain foods
- Drops during sleep or fasting
- Stability during exercise
Key CGM Metrics:
- Time in Range (70–140 mg/dL): Aim for 70% or more
- Time Above Range: Minimise for better long-term health
- Glucose Variability: Flatter curves are healthier
CGMs help fine-tune your meals, workouts, and even sleep for optimal blood sugar stability.
Target Glucose Ranges (General)
| Time | Ideal Range (mg/dL) |
|---|---|
| Fasting | 70–99 |
| Before Meals | 70–130 |
| 1 Hour After Meals | <180 |
| 2 Hours After Meals | <140 |
| Bedtime | 90–140 |
These numbers may vary based on your doctor’s advice or specific health goals.
Symptoms of Abnormal Glucose Levels
Symptoms of High Glucose (Hyperglycemia):
- Fatigue
- Blurry vision
- Frequent urination
- Headaches
- Thirst
Symptoms of Low Glucose (Hypoglycemia):
- Shakiness
- Sweating
- Rapid heartbeat
- Confusion
- Hunger
- Dizziness
Knowing the signs helps you respond quickly and interpret readings more accurately.
Lifestyle Tips for Healthy Glucose Levels
🟢 Eat balanced meals with protein, fibre, and healthy fats
🟢 Exercise regularly to improve insulin sensitivity
🟢 Sleep 7–9 hours to reduce insulin resistance
🟢 Manage stress through mindfulness or deep breathing
🟢 Stay hydrated and avoid sugary drinks
🟢 Use a glucose tracker or journal to log patterns
Final Words:
If you’ve ever felt tired after a meal, craved sugar, or worried about diabetes, your body might be sending you important signals. Learning how to interpret glucose levels is one of the most empowering health skills you can develop whether you’re managing a condition or simply aiming to feel your best.
Blood sugar isn’t just a number it’s a reflection of your metabolism, hormone balance, and lifestyle. High levels over time can damage your heart, eyes, kidneys, and nerves. Low levels can cause accidents, confusion, or even loss of consciousness. But with regular monitoring and understanding, you can take action before serious complications arise.
The beauty of today’s technology is that you no longer have to guess. With a simple finger prick or a continuous glucose monitor, you can learn how different meals, workouts, and stress levels affect you in real time. You become your own biofeedback system adjusting when needed, improving where necessary.
And the rewards go far beyond disease prevention. Better glucose control means stable energy, fewer cravings, better sleep, a sharper mind, and even better mood. For those with diabetes or prediabetes, it means a longer, fuller life.
In short, learning how to interpret glucose levels isn’t just about numbers it’s about awareness, action, and ownership of your health.
Must Read:
- Natural Ways to Lower Blood Sugar
- What Brings Sugar Down Immediately?
- Best Nephrogenic Diabetes Insipidus Treatment Options in 2025
FAQs:
1. What is a normal fasting glucose level?
A normal fasting glucose level is between 70 and 99 mg/dL.
2. What is the difference between A1C and daily glucose checks?
A1C reflects average glucose over 2–3 months, while daily checks show real-time blood sugar patterns.
3. Can I interpret glucose without a doctor?
Yes, but it’s best to discuss patterns and abnormal results with a healthcare provider for personalized advice.
4. What if my glucose is normal but I still feel tired?
You might be experiencing spikes and drops not visible in one reading—try using a CGM or checking post-meal values.
5. What is time-in-range in glucose monitoring?
Time-in-range refers to the percentage of time your glucose stays within 70–140 mg/dL. The higher the better.
6. Do non-diabetics need to check glucose?
It’s optional, but those with a family history, PCOS, or symptoms of insulin resistance may benefit from occasional checks.